Prerequisites
You have to install the database server with the client before practicing the examples in this tutorial. The MariaDB database server and client are used in this tutorial.
1. Run the following commands to update the system:
2. Run the following command to install the MariaDB server and client:
3. Run the following command to install the security script for the MariaDB database:
4. Run the following command to restart the MariaDB server:
6. Run the following command to log in to the MariaDB server:
List of SQL Query Examples
- Create the Database
- Create the Tables
- Rename the Table Name
- Add a New Column to the Table
- Remove the Column from the Table
- Insert a Single Row into the Table
- Insert Multiple Rows into the Table
- Read All of the Particular Fields from the Table
- Read the Table After Filtering the Data from the Table
- Read the Table After Filtering the Data Based on Boolean Logic
- Read the Table After Filtering the Rows Based on the Range of Data
- Read the Table After Sorting the Table Based on the Particular Columns.
- Read the Table by Setting the Alternative Name of the Column
- Count the Total Number of Rows in the Table
- Read the Data from Multiple Tables
- Read the Table by Grouping the Particular Fields
- Read the Table After Omitting the Duplicate Values
- Read the Table by Limiting the Row Number
- Read the Table Based on the Partial Match
- Count the Sum of the Particular Field of the Table
- Find the Maximum and Minimum Values of the Particular Field
- Read the Data on the Particular Part of a Field
- Read the Table Data After Concatenation
- Read the Table Data After Mathematical Calculation
- Create a View of the Table
- Update the Table Based on the Particular Condition
- Delete the Table Data Based on the Particular Condition
- Delete All Records from the Table
- Drop the Table
- Drop the Database
Create the Database
Suppose we have to design a simple database for Library Management System. To do this task, a database needs to create in the server that contians multiple relational tables. After logging in to the database server, run the following command to create a database named “library” in the MariaDB database server:
The output shows that the library database is created on the server:

The output shows that the library database is selected:
Create the Tables
The next step is to create the necessary tables for the database to store the data. Three tables are created in this part of the tutorial. These are books, members, and borrow_info tables.
- The books table stores all book-related data.
- The members table stores all information about the members who borrows the book from the library.
- The borrow_info table stores the information about which book is borrowed by which member.
1. Books Table
Run the following SQL statement to create a table named “books” in the “library” database that contains seven fields and one primary key. Here, the “id” field is the primary key and the data type is int. The auto_increment attribute is used for the “id” field. So, the value of this field is incremented automatically when a new row is inserted. The varchar data type is used to store the string data of the variable length. The title, author, publication, and isbn fields store the string data. The data type of the total_copy and price fields are int. So, these fields store the numeric data.
id INT AUTO_INCREMENT,
title VARCHAR(50),
author VARCHAR(50),
publication VARCHAR(100),
isbn VARCHAR(30),
total_copy INT,
price INT,
PRIMARY KEY (id));
The output shows that the “books” table is created successfully:
2. Members Table
Run the following SQL statement to create a table named “members” in the “library” database that contains 5 fields and one primary key. The “id” field has the auto_increment attribute like the “books” table. The data type of the other fields is varchar. So, these fields store the string data.
id INT AUTO_INCREMENT,
name VARCHAR(50),
address VARCHAR(200),
contact_no VARCHAR(15),
email VARCHAR(50),
PRIMARY KEY (id));
The output shows that the “members” table is created successfully:
3. Borrow_info Table
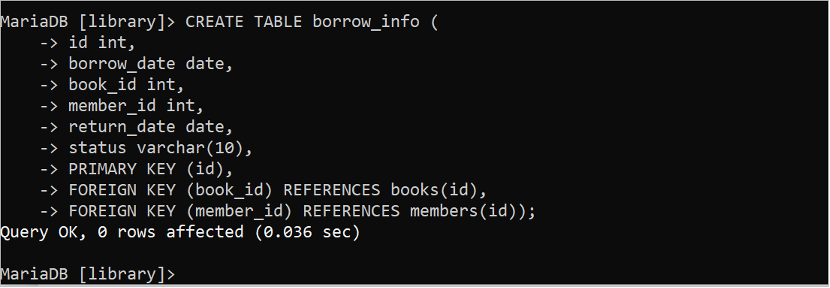
Run the following SQL statement to create a table named “borrow_info” in the “library” database that contains 6 fields. Here, the “id” field is the primary key but the auto_increment attribute is not used for this field. So, a unique value is inserted manually into this field when a new record is inserted into the table. The book_id and the member_id fields are foreign keys for this table; those are the primary key of the “books” table and “members” table. The data type of borrow_date and return_date fields are date. So, these two fields store the date value in the “YYYY-MM-DD” format.
id INT,
borrow_date DATE,
book_id INT,
member_id INT,
return_date DATE,
STATUS VARCHAR(10),
PRIMARY KEY (id),
FOREIGN KEY (book_id) REFERENCES books(id),
FOREIGN KEY (member_id) REFERENCES members(id));
The output shows that the “borrow_info” table is created successfully:
Rename the Table Name
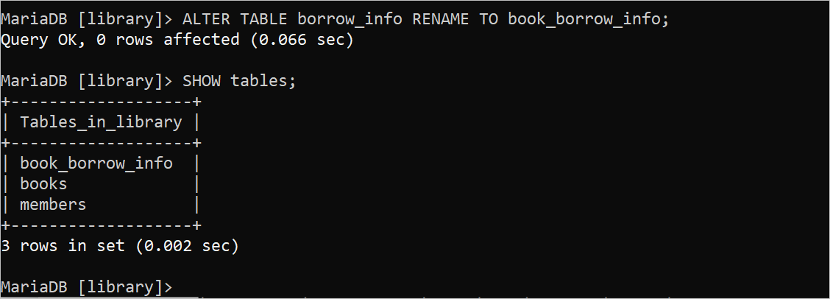
The ALTER TABLE statement can be used for multiple purposes in the SQL statements. Run the following ALTER TABLE statement to change the name of the “borrow_info” table to “book_borrow_info”. Next, the SHOW tables statement can be used to check if the name of the table has been changed or not.
SHOW TABLES;
The output shows that the table name has been changed successfully and the name of the borrow_info table has been changed to book_borrow_info:
Add a New Column to the Table
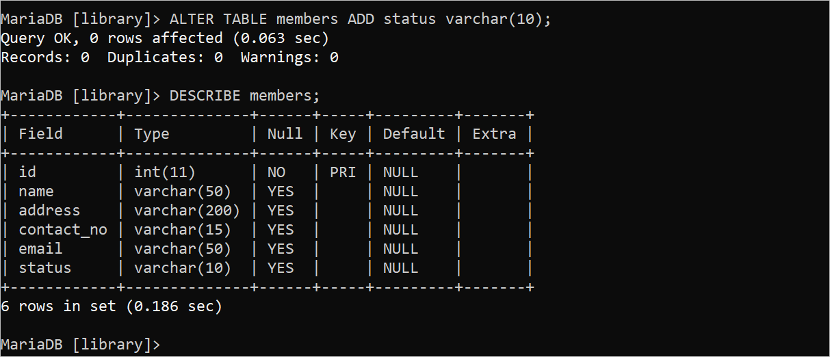
The ALTER TABLE statement can be used to add or delete one or more columns after creating the table. The following ALTER TABLE statement adds a new field named “status” to the table members. The DESCRIBE statement is used to show whether the table structure has been changed or not.
DESCRIBE members;
The output shows that a new column which is “status” is added to the “members” table and the data type of the table is varchar:
Remove the Column from the Table
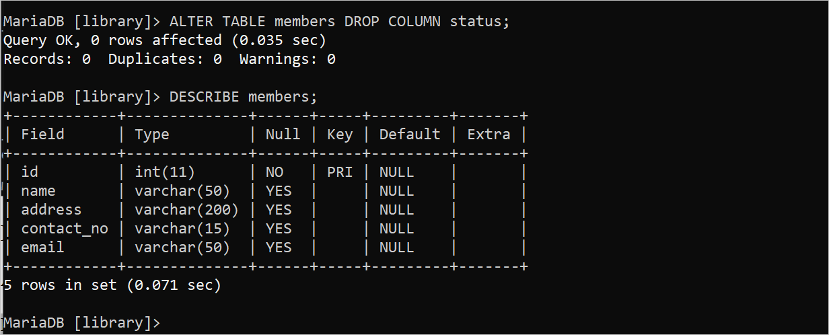
The following ALTER TABLE statement deletes the field named “status” from the “members” table. The DESCRIBE statement is used to show whether the table structure has been changed or not.
DESCRIBE members;
The output shows that the “status” column is removed from the “members” table:
Insert a Single Row into the Table
The INSERT INTO statement is used to insert one or more rows into the table. Run the following SQL statement to insert a single row into the “books” table. Here, the “id” field is omitted from this query because it is inserted automatically into the record when a new record is inserted for the auto-increment attribute. If this field is used in the INSERT statement, the value must be NULL.
VALUES ('SQL in 10 Minutes', 'Ben Forta', 'Sams Publishing', '784534235', 5, 39);
The output shows that a record is added to the “books” table successfully:
The data can be inserted into the table using the SET clause where each field value is assigned separately. Run the following SQL statement to insert a single row into the “members” table using the INSERT INTO and SET clauses. The “id” field is also omitted in this query like the previous example for the same reason.
SET name='John Sina', address='34, Dhanmondi 9/A, Dhaka', contact_no='+14844731336', email='[email protected]';
The output shows that a record is added to the members table successfully:
Run the following SQL statement to insert a single row into the “book_borrow_info” table:
VALUES (1, '2023-03-12', 1, 1, '2023-03-19' , 'Borrowed');
The output shows that a record is added to the “book_borrow_info” table:
Insert Multiple Rows into the Table
Sometimes, it requires adding many records at a time using a single INSERT INTO statement. Run the following SQL statement to insert three records into the “books” table using a single INSERT INTO statement. In this case, the VALUES clause is used for one time and the data of each record are separated by comma.
VALUES
("SQL Cookbook (O'Reilly)", "Anthony Molinaro", "O'Reilly", "2467777532", 10, 49),
("SQL Queries for Mere Mortals", "John Viescas", "Addison-Wesley", '673456234', 15, 35),
("Learning SQL", "Alan Beaulieu", "Penguin Books Ltd", "534433222", 12, 45);
The output shows that three records are added to the “books” table:
Read All of the Particular Fields from the Table
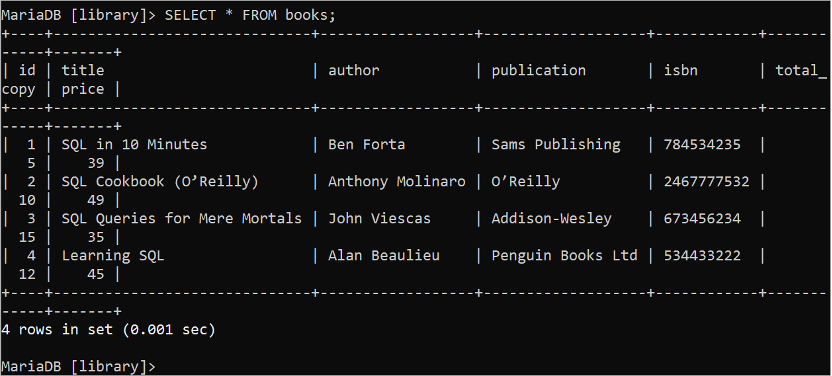
The SELECT statement is used to read the data from the “database” table. The “*” symbol is used to denote all fields of the table in the SELECT statement. Run the following SQL command to read all records of the books table:
The output shows all records of the books table that contains 4 records:
Run the following SQL command to read all records of three fields of the “members” table:
The output shows all records of three fields of the “members” table:
Read the Table After Filtering the Data from the Table
The WHERE clause is used to read the data from a table based on one or more conditions. Run the following SELECT statement to read all records of all fields of the “books” table where the author name is “John Viescas”.
The “books” table contains one record that matches the condition of the WHERE clause which is shown in the output:
Read the Table After Filtering the Data Based on Boolean Logic
The Boolean AND logic is used to define multiple conditions in the WHERE clause that returns true if all conditions return true. Run the following SELECT statement to read all records of all fields of the “books” table where the value of the total_copy field is more than 10 and the value of the price field is less than 45 using the logical AND.
The books table contains one record that matches the condition of the WHERE clause which is shown in the output:
The Boolean OR logic is used to define multiple conditions in the WHERE clause that returns true if any of the conditions returns true. Run the following SELECT statement to read all records of all fields of the “books” table where the value of the total_copy field is more than 10 or the value of the price field is more than 40.
The books table contains three records that match the condition of the WHERE clause which is shown in the output:
The Boolean NOT logic is used to return false when the condition is true and returns true when the condition is false. Run the following SELECT statement to read all records of all fields of the “books” table where the value of the author field is not “Addison-Wesley”.
The “books” table contains three records that match the condition of the WHERE clause which is shown in the output:
Read the Table After Filtering the Rows Based on the Range of Data
The BETWEEN clause is used to read the range of data from the database table. Run the following SELECT statement to read all records of all fields of the “books” table where the value of the price field is between 40 to 50.
The books table contains two records that match the condition of the WHERE clause which is shown in the output. The books of the price values, 39 and 35, are omitted from the result set because those are out of range.
Read the Table After Sorting the Table
The ORDER BY clause is used to sort the result set of the SELECT statement in ascending or descending order. The result set is sorted in ascending order by default if the ORDER BY clause is used without ASC or DESC. The following SELECT statement reads the sorted records from the books table based on the title field:
The data of the title field of the “books” table is sorted in ascending order in the output. The “Learning SQL” book comes first alphabetically if the title field of the “books” table is sorted in ascending order.
Read the Table by Setting the Alternative Name of the Column
The alternative name of the column is used in the query to make the result set more readable. The alternative name is set using the “AS” keyword. The following SQL statement returns the values of the title and author fields by setting the alternative names.
FROM books;
The title field is displayed with the alternative name which is “Book Name” and the author field is displayed with the alternative name which is “Author Name” in the output.
Count the Total Number of Rows in the Table
The COUNT() is an aggregate function of SQL that is used to count the total number of rows based on the particular field or all fields. The “*” symbol is used to denote all fields and the COUNT(*) is used to count all records of the table.
The following query counts the total records of the books table:
Four records in the “books” table are shown in the output:
The following query counts the total rows of the “members” table based on the “id” field:
The “members” table has two id values that are printed in the output:
Read the Data from Multiple Tables
The previous SELECT statements retrieved the data from a single table. But the SELECT statement can be used to retrieve the data from two or more tables. The following SELECT query reads the values of the title and author fields from the “books” table and the borrow_date from the “book_borrow_info” table.
FROM books, book_borrow_info
WHERE books.id = book_borrow_info.book_id;
The following output shows that the “SQL in 10 Minutes” book is borrowed two times and the “SQL Cookbook (O’Reilly)” book is borrowed one time:
The data can be retrieved from the multiple tables using different types of JOINS such as INNER JOIN, OUTER JOIN, etc. which are not explained in this tutorial.
Read the Table by Grouping the Particular Fields
The GROUP BY clause is used to read the records from the table by grouping the rows based on one or more fields. This type of query is called a summary query. You have to insert multiple rows in the tables to check the use of the GROUP BY clause. Run the following INSERT statements to insert one record into the “members” table and two records into the “book_borrow_info” table.
SET name='Ella Hasan', address='11/A, Jigatola, Dhaka', contact_no='+8801734563423', email='[email protected]';
INSERT INTO book_borrow_info (id, borrow_date, book_id, member_id, return_date, STATUS)
VALUES (2, '2023-04-10', 1, 1, '2023-04-15' , 'Returned');
INSERT INTO book_borrow_info (id, borrow_date, book_id, member_id, return_date, STATUS)
VALUES (3, '2023-05-20', 2, 1, '2023-05-30', 'Borrowed');
After inserting the data by executing the previous queries, run the following SELECT statement that counts the total number of borrowed books and member’s name based on each member using the GROUP BY clause. Here, the COUNT() function works on the field that is used to regroup the records using the GROUP BY clause. The book_id field of the “members” table is used for grouping here.
According to the data of the books, “members” and “book_borrow_info” tables, “John Sina” borrowed 2 books and “Ella Hasan” borrowed 1 book.
Read the Table After Omitting the Duplicate Values
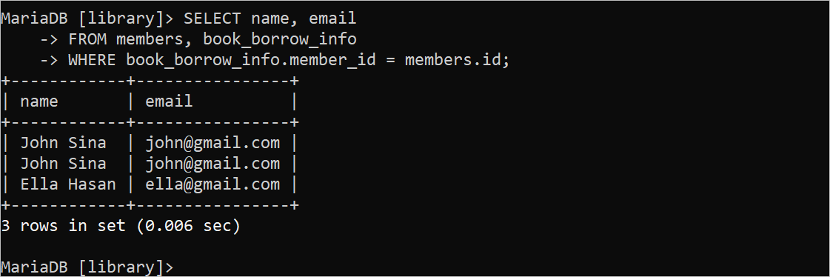
Sometimes, duplicate data are generated in the result set of the SELECT statement based on the table data that is unnecessary. For example, the following SELECT statement returns the duplicate records for the data of the “book_borrow_info” table.
FROM members, book_borrow_info
WHERE book_borrow_info.member_id = members.id;
In the output, the same record appears twice because the “John Sina” member borrowed two books. This problem can be solved using the DISTINCT keyword. It removes the duplicate records from the query result.
The following SELECT statement generates unique records of the result set from the “members” and “book_borrow_info” tables after omitting the duplicate values using the DISTINCT keyword in the query.
FROM members, book_borrow_info
WHERE book_borrow_info.member_id = members.id;
The output shows that the duplicate value is removed from the result set:
Read the Table by Limiting the Row Number
Sometimes, it requires reading the particular number of records from the beginning of the result set, the end of the result set, or the middle of the result set from the database table by limiting the row number. It can be done in many ways. Before limiting the rows, run the following SQL statement to check how many records exist in the books table:
The output shows that the books table has four records:
The following SELECT statement reads the first two records from the “books” table using the LIMIT clause with the value of 2:
The first two records of the “books” table are retrieved which is shown in the output:
The FETCH clause is the alternative of the LIMIT clause and its use is shown in the following SELECT statement. The first 3 records of the “books” table are retrieved using the FETCH FIRST 3 ROWS ONLY clause in the SELECT statement:
The output shows the first 3 records of the “books” table:
Two records from the 3rd row of the books table are retrieved by executing the following SELECT statement. The LIMIT clause is used with the 2, 2 value here where the first 2 defines the starting position of the row of the table that starts counting from 0 and the second 2 defines the number of rows that starts counting from the starting position.
The following output appears after executing the previous query:
The records from the end of the table can be read by sorting the table in descending order based on the auto-incremented primary key value and using the LIMIT clause. Run the following SELECT statement that reads the last 2 records from the “books” table. Here, the result set is sorted in descending order based on the “id” field.
The last two records of the books table are shown in the following output:
Read the Table Based on the Partial Match
The LIKE clause is used with the “%” symbol to retrieve the records from the table by partial matching. The following SELECT statement searches the records from the “books” table where the author field contains “John” at the beginning of the value using the LIKE clause. Here, the “%” symbol is used at the end of the search string.
Only one record exists in the “books” table that contains the “John” string at the start of the value of the author field.
The following SELECT statement searches the records from the “books” table where the publication field contains the “Ltd” at the end of the value using the LIKE clause. Here, the “%” symbol is used at the beginning of the search string:
Only one record exists in the “books” table that contains the “Ltd” string at the end of the publication field.
The following SELECT statement searches the records from the “books” table where the title field contains the “Queries” anywhere of the value using the LIKE clause. Here, the “%” symbol is used on both sides of the search string:
Only one record exists in the “books” table that contains the “Queries” string at the title field.
Count the Sum of the Particular Field of the Table
The SUM() is another useful aggregate function of SQL that calculates the sum of the values of any numeric field of the table. This function takes one argument that must be numeric. The following SQL statement calculates the sum of all values of the price field of the “books” table that contains integer values.
FROM books;
The output shows the summation value of all values of the price field of the “books” table. Four values of the price field are 39, 49, 35, and 45. The sum of these values is 168.
Find the Maximum and Minimum Values of the Particular Field
The MIN() and MAX() aggregate functions are used to find out the minimum and maximum values of the particular field of the table. Both functions take one argument that must be numeric. The following SQL statement finds out the minimum price value from the “books” table which is an integer.
Thirty-five (35) is the minimum value of the price field that is printed in the output.
The following SQL statement finds out the maximum price value from the “books” table:
Forty-nine (49) is the maximum value of the price field that is printed in the output.
Read the Particular Part of the Data or a Field
The SUBSTR() function is used in the SQL statement to retrieve the particular portion of the string data or the value of the particular field of a table. This function contains three arguments. The first argument contains the string value or a field value of a table which is a string. The second argument contains the starting position of the sub-string that is retrieved from the first argument and the counting of this value starts from 1. The third argument contains the length of the sub-string that starts counting from the starting position.
The following SELECT statement cuts and prints the first five characters from the “Learn SQL Basics” string where the starting position is 1 and the length is 5:
The first five characters of the “Learn SQL Basics” string is “Learn” which is printed in the output.
The following SELECT statement cuts and prints the SQL from the “Learn SQL Basics” string where the starting position is 7 and the length is 3:
The following output appears after executing the previous query:
The following SELECT statement cuts and prints the first five characters from the name field of the “members” table:
The output shows the first five characters of each value of the name field of the “members” table.
Read the Table Data After Concatenation
The CONCAT() function is used to generate the output by combining one or more fields of a table or adding the string data or the particular field value of the table. The following SQL statement reads the values of the title, author, and price fields of the “books” table, and the “$”string value is added with each value of the price field using the CONCAT() function.
FROM books;
The values of the price field are printed in the output by concatenating with the “$” string.
Run the following SQL statement to combine the values of the title and author fields of the “books” table with the “by” string value using the CONCAT() function:
FROM books;
The following output appears after executing the previous SELECT query:
Read the Table Data After a Mathematical Calculation
Any mathematical calculation can be performed at the time of retrieving the values of the table using a SELECT statement. Run the following SQL statement to read the id, title, price, and discounted price value after calculating the 5% discount.
FROM books;
The following output shows the regular price and discount price of each book:
Create a View of the Table
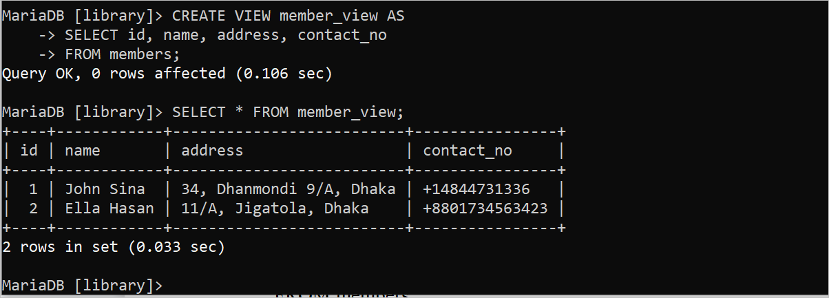
The VIEW is used to make the query simple and provides extra security to the database. It works like a virtual table that is generated from one or more tables. The method of creating and executing a simple VIEW based on the “members” table is shown in the following example. The VIEW is executed using the SELECT statement. The following SQL statement creates a VIEW of the “members” table with the id, name, address, and contact_no fields. The SELECT statement executes the member_view.
SELECT id, name, address, contact_no
FROM members;
SELECT * FROM member_view;
The following output appears after creating and executing the view:
Update the Table Based on the Particular Condition
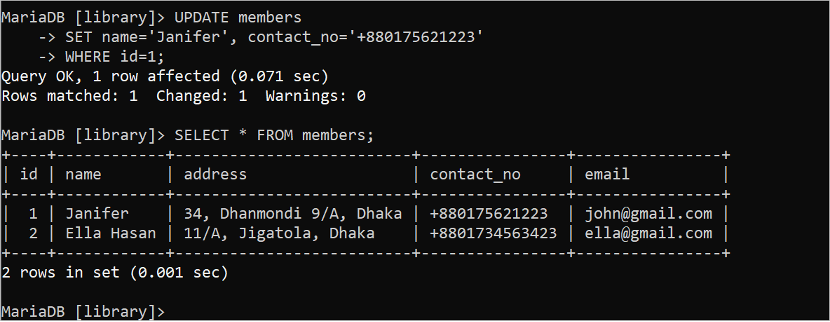
The UPDATE statement is used to update the content of the table. If any UPDATE query is executed without the WHERE clause, all fields that are used in the UPDATE query are updated. So, it is necessary to use an UPDATE statement with the proper WHERE clause. Run the following UPDATE statement to update the name and contact_no fields where the value of the id field is 1. Next, execute the SELECT statement to check whether the data is updated properly or not.
SET name='Janifer', contact_no='+880175621223'
WHERE id=1;
SELECT * FROM members;
The following output shows that the UPDATE statement is executed successfully. The value of the name field is changed to “Janifer” and the contact_no field is changed to “+880175621223” of the record which contains the id value of 1 using the UPDATE query:
Delete the Table Data Based on the Particular Condition
The DELETE statement is used to delete the specific content or all content of the table. If any DELETE query is executed without the WHERE clause, all fields are deleted. So, it is necessary to use the UPDATE statement with the proper WHERE clause. Run the following DELETE statement to delete all data from the books table where the id value is 4. Next, execute the SELECT statement to check whether the data is deleted properly or not.
SELECT * FROM books;
The following output shows that the DELETE statement is executed successfully. The 4th record of the books table is removed using the DELETE query:
Delete All Records from the Table
Run the following DELETE statement to delete all records from the “books” table where the WHERE clause is omitted. Next, execute the SELECT query to check the table content.
SELECT * FROM book_borrow_info;
The following output shows that the “books” table is empty after executing the DELETE query:
If any table contains an auto-increment attribute and all records are deleted from the table, the auto-increment field starts counting from the last increment when a new record is inserted after making the table empty. This problem can be solved using the TRUNCATE statement. It is also used to delete all records from the table but the auto-increment field starts counting from 1 after deleting all records from the table. The SQL of the TRUNCATE statement is shown in the following:
Drop the Table
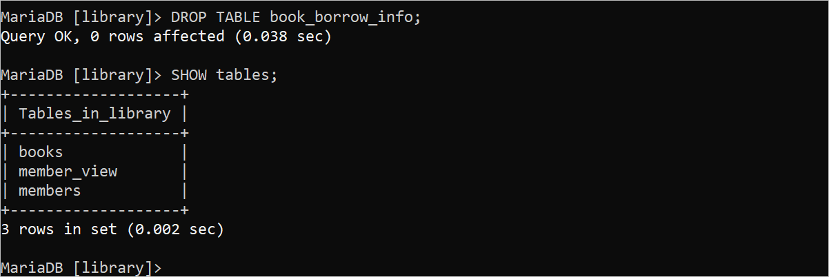
One or more tables can be dropped by checking or without checking whether the table exists or not. The following DROP statements delete the “book_borrow_info” table and the “SHOW tables” statement checks whether the table exists or not on the server.
SHOW TABLES;
The output shows that the “book_borrow_info” table is dropped.
The table can be dropped after checking whether it exists on the server or not. Run the following DROP statement to delete the books and members table if these tables exist in the server. Next, the “SHOW tables” statement checks whether the tables exist or not on the server.
SHOW TABLES;
The following output shows that the tables are deleted from the server:
Drop the Database
Run the following SQL statement to delete the “library” database from the server:
The output shows that the database is dropped.
Conclusion
The mostly used SQL query examples to create, access, modify, and delete the database of the MariaDB server are shown in this tutorial by creating a database and three tables. The uses of different SQL statements are explained with very simple examples to help the new database user to learn the SQL basics properly. The uses of complex queries are omitted here. The new database users will be able to start working with any database after reading this tutorial properly.


