
Java is a versatile programming language. Many types of applications can be developed easily using this language. The Java Swing toolkit is used to develop desktop applications. Java Swing contains all GUI components to implement the Graphical User Interface (GUI) for the desktop application. The Abstract Window Toolkit (AWT) was used in the earlier version of Java to develop GUI for the desktop application. But AWT contains only the basic GUI components such as labels, textboxes, buttons, etc. for designing the interface of desktop applications. Many advanced-level GUI components such as tab pane, menus, table, scroll bar, etc. have been added to the Java Swing toolkit. The “java.swing” package contains all the components and classes of the Java Swing toolkit. The most basic uses of the Java swing controls to develop the desktop applications are shown in this tutorial using 15 Java swing examples.
Prerequisites:
You have to complete the following task before practicing the examples of this tutorial.
A. Install JDK.
Download the latest version of JDK from the following URL address:
https://www.oracle.com/in/java/technologies/downloads/
B. Download and install a popular Java editor.
Different types of editors exist to write and execute the Java code such as Eclipse, Netbeans, etc. The Eclipse editor is used here. You can check this tutorial to install the Eclipse editor.
List of Java Swing Examples
- Display a Simple Window
- Simple Form Design with Label and Button
- Form Design with Basic Controls
- Display the Different Types of Dialog Boxes
- Form Validation
- Open an Existing File
- Write a Content into a File
- Display the Current Data and Time
- Create a Simple Menu Bar
- Create a Popup Menu
- Create Toolbar
- Display Tabular Data
- Working with Image
- Generate a Random Number
- Develop a Simple Login System
Display a Simple Window
The JFrame is used to create the GUI-based applications in Java. It is used to display the output in a dialog box. Create a Java file with the following code that displays a dialog with the title, “Java Swing Example-1”, at the center of the screen.
class SwingExample1 {
public static void main(String[] args) {
//Declare JFrame object
JFrame frame = new JFrame();
//Set the title
frame.setTitle("Java Swing Example-1");
//Set the frame size
frame.setSize(350, 150);
//Disable the resize option
frame.setResizable(false);
//Set frame position to the center of the screen
frame.setLocationRelativeTo(null);
//Make the frame visible
frame.setVisible(true);
}
}
Output:
The following dialog box will appear after executing the Java class file:

Simple Form Design with Label and Button
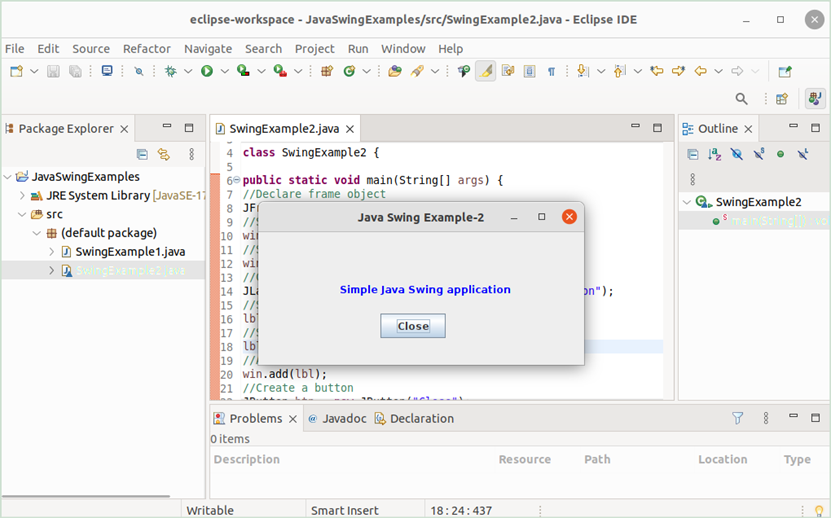
The JLabel class is used to create a label and the JButton class is used to create a button in Java. Create a Java file with the following code to display a dialog box with a label and a button. The title of the dialog box is “Java Swing Example-2”. The value of the label is “Simple Java Swing application” with a blue font color. The caption of the button is “Close”.
import javax.swing.*;
class SwingExample2 {
public static void main(String[] args) {
//Declare frame object
JFrame win = new JFrame();
//Set the title
win.setTitle("Java Swing Example-2");
//Set the window size
win.setSize(400, 200);
//Create label object
JLabel lbl = new JLabel("Simple Java Swing application");
//Set label font color
lbl.setForeground(Color.blue);
//Set the label position
lbl.setBounds(100,20,250,100);
//Add label to frame
win.add(lbl);
//Create a button
JButton btn = new JButton("Close");
//Set the button position
btn.setBounds(150, 100, 80, 30);
//Add button to frame
win.add(btn);
//Set window position
win.setLocationRelativeTo(null);
//Disable default layout of the frame
win.setLayout(null);
//Make the window visible
win.setVisible(true);
}
}
Output:
The following dialog box will appear after executing the Java class file:
Form Design with Some Basic Controls
Java has many swing controls to take input from the user. Create a Java file with the following code to know the uses of some basic swing controls. The uses of textbox, radio buttons, and text area controls are shown in this example. The textbox is used to take the product name. The radio button is used to select the product type. The text area is used to take the product description.
class SwingExample3 {
public static void main(String[] args) {
//Declare frame object
JFrame win = new JFrame();
//Set the title
win.setTitle("Java Swing Example-3");
//Set the window size
win.setSize(500, 320);
//Create a label object, set the position, and add to the frame
JLabel lbl1 = new JLabel("Product Name:", JLabel.LEFT);
lbl1.setBounds(80,20,100,20);
win.add(lbl1);
//Create text object set the position, and add to the frame
JTextField name = new JTextField();
name.setBounds(200,20,200,20);
win.add(name);
//Create a label object, set the position, and add to the frame
JLabel lbl2 = new JLabel("Product Type:", JLabel.LEFT);
lbl2.setBounds(80,60,100,20);
win.add(lbl2);
//Create the radio buttons, set the position, and add to the frame
JRadioButton rdbtn1 = new JRadioButton("Local");
rdbtn1.setActionCommand("Local");
JRadioButton rdbtn2 = new JRadioButton("Foreign");
rdbtn2.setActionCommand("Foreign");
rdbtn1.setBounds(200,40,80,50);
rdbtn2.setBounds(300,40,90,50);
ButtonGroup bgrp = new ButtonGroup();
bgrp.add(rdbtn1);
bgrp.add(rdbtn2);
win.add(rdbtn1);
win.add(rdbtn2);
/*Create a label object, set the position, and add to the frame */
JLabel lbl3 = new JLabel("Desctiption:", JLabel.LEFT);
lbl3.setBounds(80,100,120,20);
win.add(lbl3);
//Create textarea object set the position, and add to the frame
JTextArea txtArea = new JTextArea();
txtArea.setBounds(200,100,200,100);
win.add(txtArea);
//Create a button, set the position, and add to the frame
JButton btn = new JButton("Submit");
btn.setBounds(200, 220, 100, 30);
win.add(btn);
//Set window position
win.setLocationRelativeTo(null);
//Disable the default layout of the frame
win.setLayout(null);
//Make the window visible
win.setVisible(true);
}
}
Output:
The following dialog box will appear after executing the Java class file:

Display the Different Types of Dialog Boxes
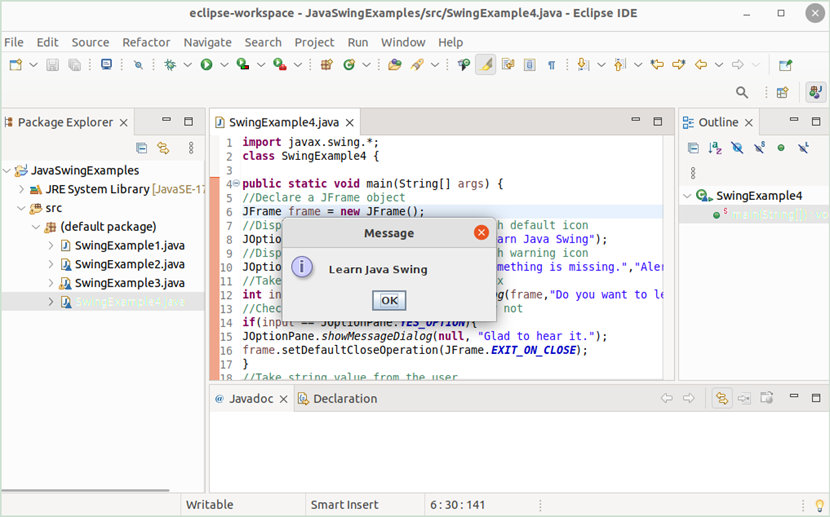
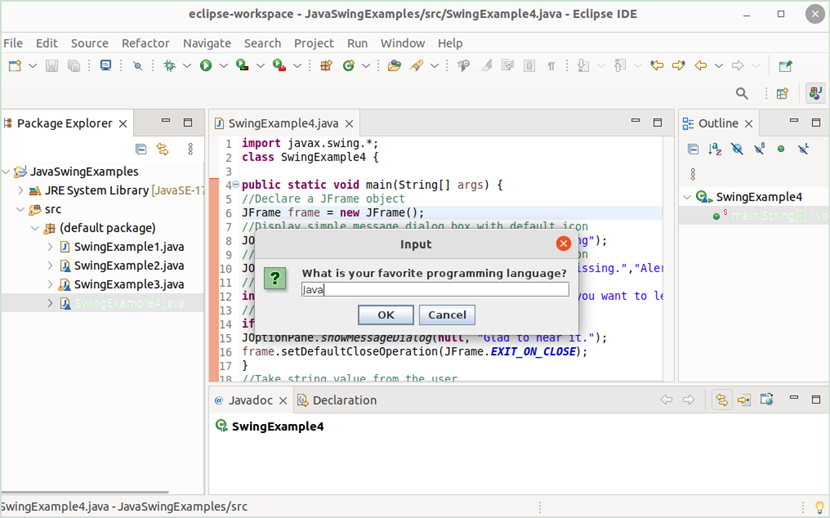
Different dialog boxes are used in Java to display the messages with different types of buttons and take input from the user. Create a Java file with the following code that displays a message box with an OK button, a message box with the Yes, No, and Cancel buttons, and an input dialog box to take input from the user.
class SwingExample4 {
public static void main(String[] args) {
//Declare a JFrame object
JFrame frame = new JFrame();
//Display a simple message dialog box with a default icon
JOptionPane.showMessageDialog(frame,"Learn Java Swing");
//Display a simple message dialog box with a warning icon
JOptionPane.showMessageDialog(frame,"Something is missing.","Alert",JOptionPane.WARNING_MESSAGE);
//Take input from the confirm dialog box
int input =JOptionPane.showConfirmDialog(frame,"Do you want to learn Java swing?");
//Check whether the user pressed YES or not
if(input == JOptionPane.YES_OPTION){
JOptionPane.showMessageDialog(null, "Glad to hear it.");
}
//Take string value from the user
String answer = JOptionPane.showInputDialog("What is your favorite programming language? ");
//Display message with the input value
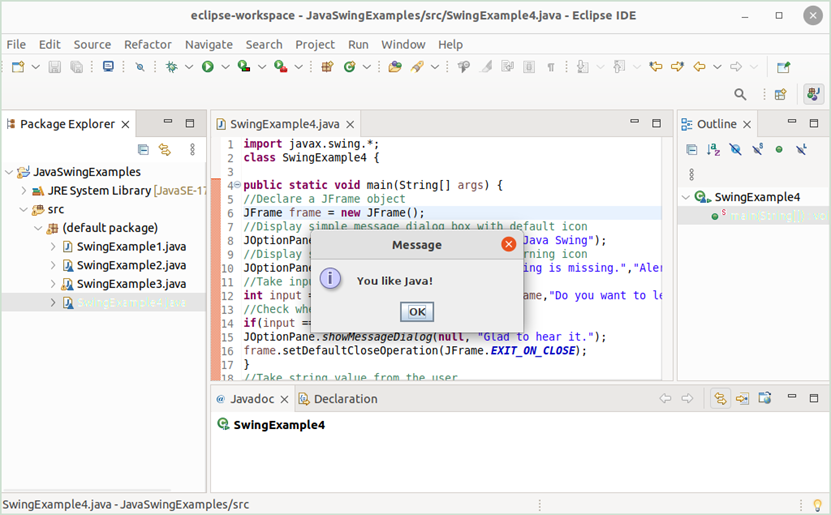
JOptionPane.showMessageDialog(null, "You like " + answer + "!");
}
}
Output:
Different dialog boxes will appear one after another after executing the Java class file. The first message box with the OK button appears in the output:
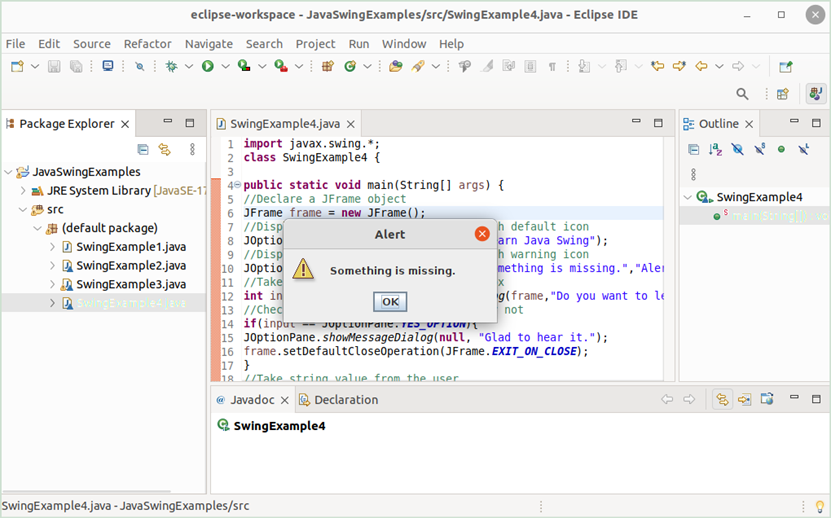
The second message box with an alert icon and an OK button appears in the next output:
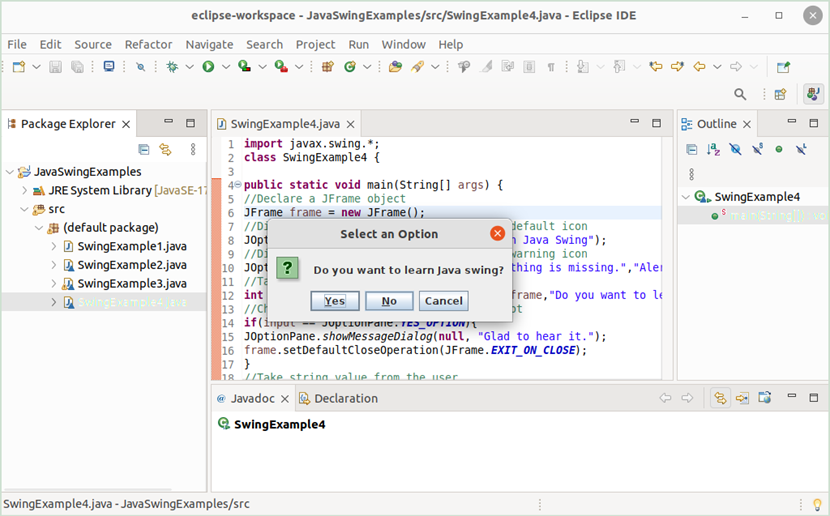
The third message box with three buttons appears in the next output:
The following output will appear if the user will select the “Yes” button from the previous dialog box:

Next, the following input dialog box will appear to take input from the user:
The value that is taken from the user is displayed in the last message box:
Form Validation
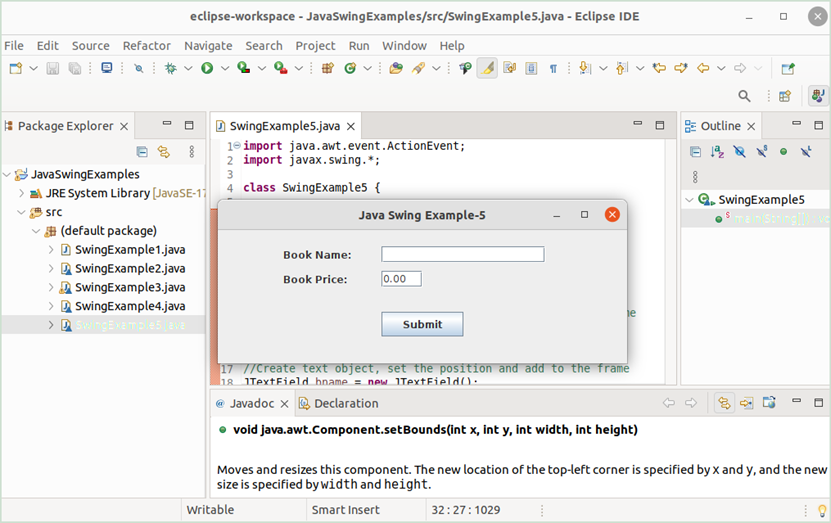
The form validation is a very important part of the desktop application. Create a Java file with the following code to show the simple form validation task in Java. Here, the form has two fields. The first field takes a string value and the second field takes a numeric value. If the valid data are provided in both fields, a message box with input values is printed in the output.
import javax.swing.*;
class SwingExample5 {
public static void main(String[] args) {
//Declare frame object
JFrame win = new JFrame();
//Set the title
win.setTitle("Java Swing Example-5");
//Set the window size
win.setSize(500, 200);
/*Create a label object, set the position, and add to the frame*/
JLabel lbl1 = new JLabel("Book Name:", JLabel.LEFT);
lbl1.setBounds(80,20,100,20);
win.add(lbl1);
/*Create text object, set the position, and add to the frame*/
JTextField bname = new JTextField();
bname.setBounds(200,20,200,20);
win.add(bname);
/*Create a label object, set the position, and add to the frame */
JLabel lbl2 = new JLabel("Book Price:", JLabel.LEFT);
lbl2.setBounds(80,50,100,20);
win.add(lbl2);
/*Create text object, set the position, and add to the frame*/
JTextField bprice = new JTextField();
bprice.setText("0.00");
bprice.setBounds(200,50,50,20);
win.add(bprice);
/*Create a button, set the position, and add to the frame */
JButton btn = new JButton("Submit");
btn.setBounds(200, 100, 100, 30);
win.add(btn);
//Set window position
win.setLocationRelativeTo(null);
//Disable the default layout of the frame
win.setLayout(null);
//Make the window visible
win.setVisible(true);
//Check whether the input values are valid or invalid
btn.addActionListener((ActionEvent e) -> {
int valid =1;
String title = bname.getText();
float cost = 0;
if(title.equals(""))
{
JOptionPane.showMessageDialog(null, "Book name can't be empty");
valid = 0;
}
try {
cost = Float.parseFloat(bprice.getText());
}
catch (NumberFormatException eg) {
JOptionPane.showMessageDialog(null, "Price must be a number.");
valid=0;
}
if(valid == 1)
{
String values = "Book Name: " + title + "\nBook Price: $" + cost;
JOptionPane.showMessageDialog(null, values);
}
});
}
}
Output:
The following dialog box will appear after executing the Java class file:
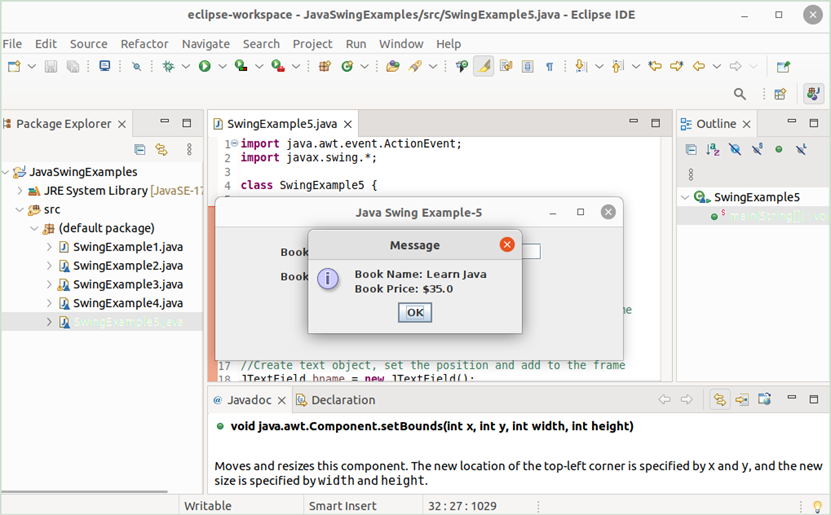
If the user provides the valid data for both fields, the following similar output will appear:
Open an Existing File
The JFileChooser class is used to open an existing file or save a file. Create a Java file with the following code that opens an existing file for reading. If the selected file contains any content, the content is displayed in the console.
import javax.swing.*;
import javax.swing.filechooser.FileNameExtensionFilter;
import javax.swing.filechooser.FileSystemView;
class SwingExample6 {
public static void main(String[] args) {
//Create a JFileChooser object
JFileChooser fc = new JFileChooser(FileSystemView.getFileSystemView().getHomeDirectory());
//Disable all file types selection
fc.setAcceptAllFileFilterUsed(false);
//Set the filter
FileNameExtensionFilter filter = new FileNameExtensionFilter("Text Files", "txt");
//Apply the filter
fc.addChoosableFileFilter(filter);
//Display open dialog box
int Val = fc.showOpenDialog(null);
//Check Open button is selected or not
if (Val == JFileChooser.APPROVE_OPTION)
{
BufferedReader buffer = null;
try
{
//Read the selected file
File sFile = fc.getSelectedFile();
//Read the path
File file = new File(sFile.getAbsolutePath());
//Initialize the BufferedReader object
buffer = new BufferedReader(new FileReader(file));
//Declare variables to store the file content
String storage="", line;
//Read the file
while ((line = buffer.readLine()) != null)
//Store the file content
storage = storage+line+"\n";
//Print the file content in the console
System.out.println(storage);
} catch (FileNotFoundException ex) {
System.out.println("File does not exist.");
} catch (IOException ex) {
System.out.println("Unable to access the file.");
}
}
}
}
Output:
The file open dialog box will appear after executing the Java class file. Any text file can be selected by browsing the folder here:
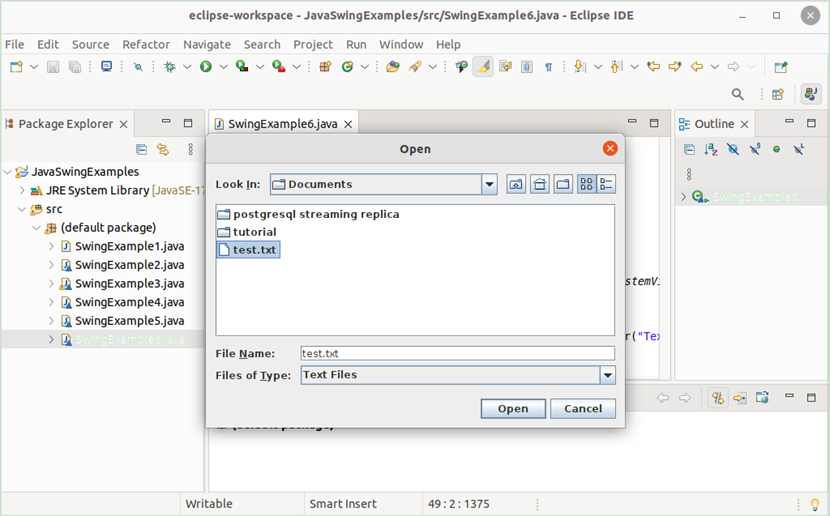
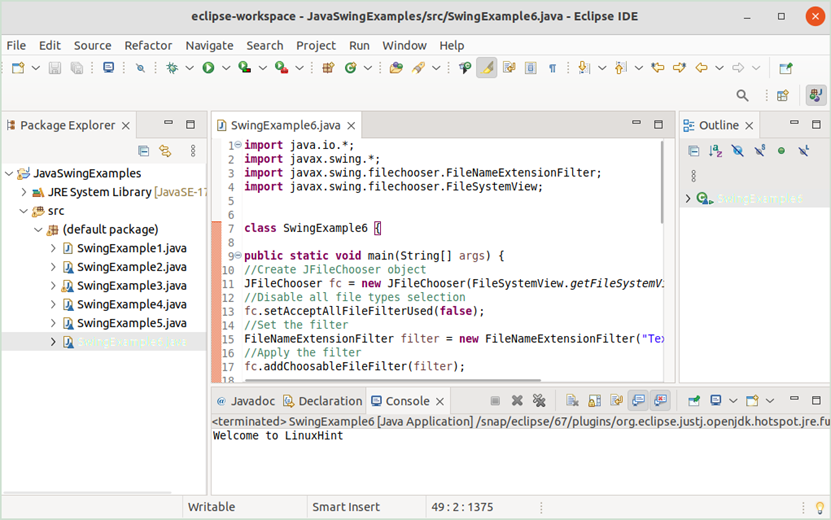
Here, the “test.txt” file is selected and the content of this file is printed in the console:
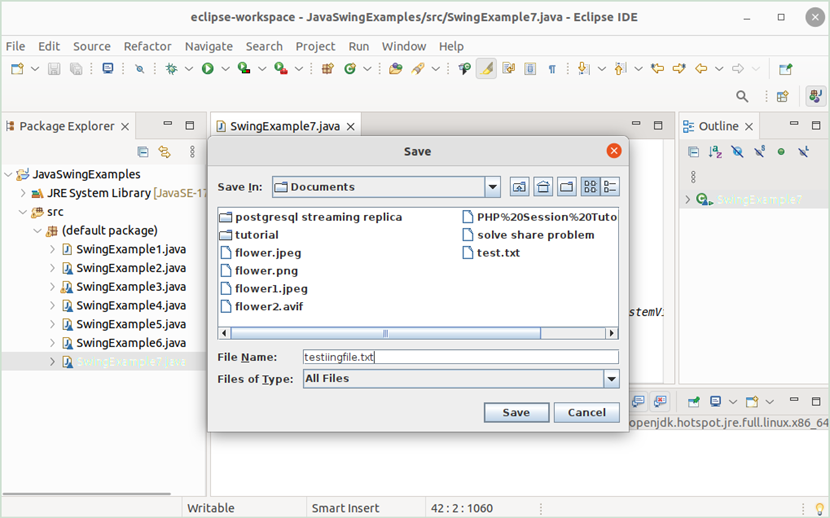
Write a Content into a File
Create a Java file with the following code that saves the string data into a new file using the “Save” dialog box. The string data is stored in the filename that is selected by the user.
import java.nio.file.Files;
import java.nio.file.Path;
import java.nio.file.Paths;
import javax.swing.*;
import javax.swing.filechooser.FileSystemView;
class SwingExample7 {
public static void main(String[] args) {
//Create a JFileChooser object
JFileChooser fc = new JFileChooser(FileSystemView.getFileSystemView().getHomeDirectory());
//Open the Save dialog box
int Val = fc.showSaveDialog(null);
//Check whether the Save button is selected or not
if (Val == JFileChooser.APPROVE_OPTION)
{
//Set the filename taken from the Save dialog box
File sFile = fc.getSelectedFile();
//Create the path object
Path path = Paths.get(sFile.getAbsolutePath());
//Store the content that will be written in the file
String strVal = "The content of the new file";
//Convert string to byte array
byte[] strArray = strVal.getBytes();
//Try-catch block to write into the file
try {
//Write the content into the file
Files.write(path, strArray);
}
catch (IOException ex) {
//Print the error message
System.out.print("File Path does not exist.");
}
}
}
}
Output:
The following dialog box will appear after executing the Java class file. Type the filename that will be created to store the data. Here, the “testingfile.txt” is used as the filename:
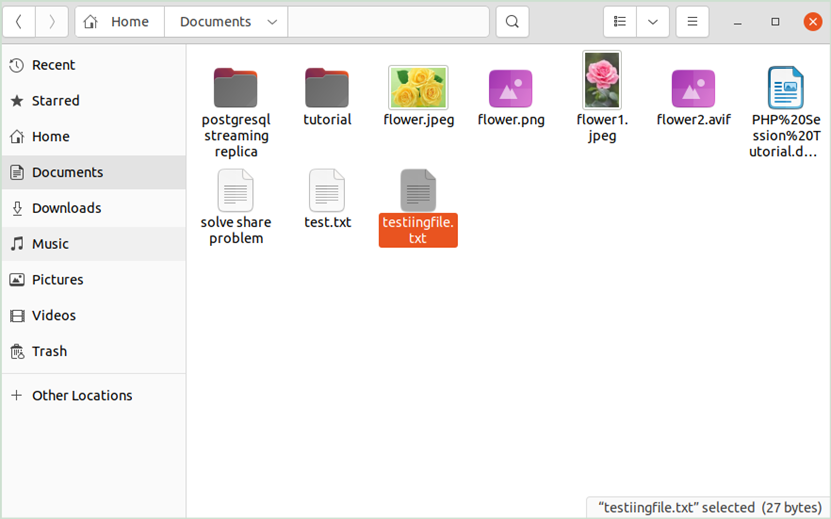
The following output shows that the file is created in the desired location:
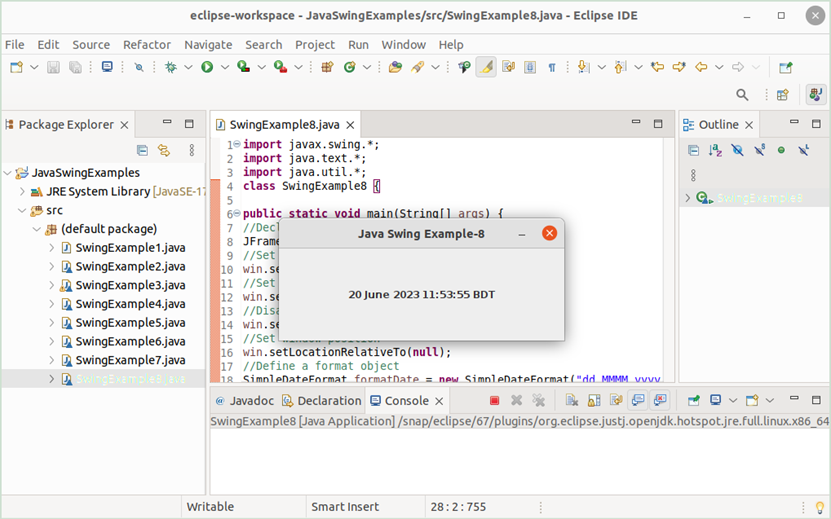
Display the Current Date and Time
The “Date” class is used to read the date and time values. Create a Java file with the following code that displays the current date and time in the dialog box:
import java.text.*;
import java.util.*;
class SwingExample8 {
public static void main(String[] args) {
//Declare frame object
JFrame win = new JFrame();
//Set the title
win.setTitle("Java Swing Example-8");
//Set the window size
win.setSize(350, 150);
//Disable the resize option
win.setResizable(false);
//Set window position
win.setLocationRelativeTo(null);
//Define a format object
SimpleDateFormat formatDate = new SimpleDateFormat("dd MMMM yyyy HH:mm:ss z");
//Declare the date object
Date dt = new Date();
//Create a label object, set the position, and add to the frame
JLabel lbl = new JLabel(formatDate.format(dt), JLabel.CENTER);
lbl.setBounds(80,20,100,20);
win.add(lbl);
//Make the window visible
win.setVisible(true);
}
}
Output:
The following dialog box will appear after executing the Java class file:
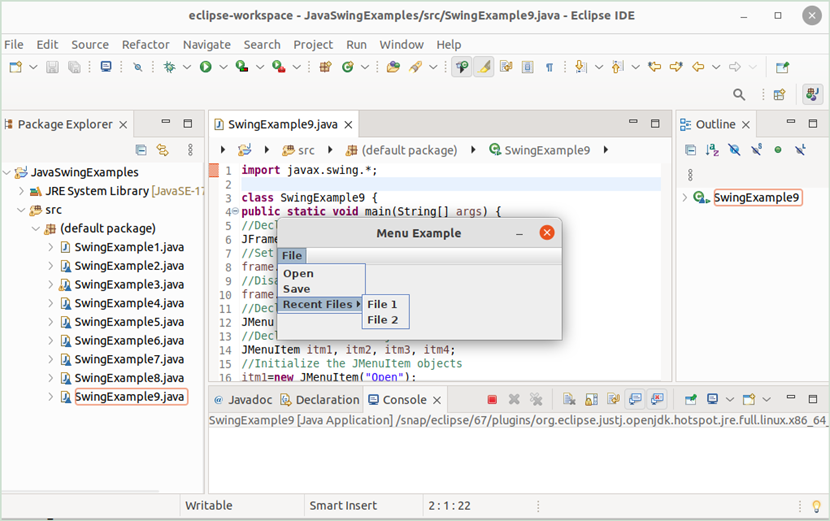
Create a Simple Menu Bar
The JMenu and the JMenuItem are used to create a menu bar in Java. Create a Java file with the following code to create a Menu bar with three items and two sub-items. The “File” menu contains three items. These are “Open”, “Save”, and “Recent” files. The last menu item contains two sub-items. These are “File 1” and “File 2”.
class SwingExample9 {
public static void main(String[] args) {
//Declare JFrame object
JFrame frame= new JFrame("Menu Example");
//Set the window size
frame.setSize(350, 150);
//Disable the resize option
frame.setResizable(false);
//Declare JMenu objects
JMenu menuItem, submenuItem;
//Declare JMenuItem objects
JMenuItem itm1, itm2, itm3, itm4;
//Initialize the JMenuItem objects
itm1=new JMenuItem("Open");
itm2=new JMenuItem("Save");
itm3=new JMenuItem("File 1");
itm4=new JMenuItem("File 2");
//Define JMenubar object
JMenuBar mbar=new JMenuBar();
//Initialize the JMenu objects
menuItem=new JMenu("File");
submenuItem=new JMenu("Recent Files");
//Add menu items
menuItem.add(itm1);
menuItem.add(itm2);
submenuItem.add(itm3);
submenuItem.add(itm4);
menuItem.add(submenuItem);
//Add menu bar item
mbar.add(menuItem);
//Add menu bar to frame
frame.setJMenuBar(mbar);
//Set the window position
frame.setLocationRelativeTo(null);
//Make the window visible
frame.setVisible(true);
}
}
Output:
The following dialog box will appear after executing the Java class file:
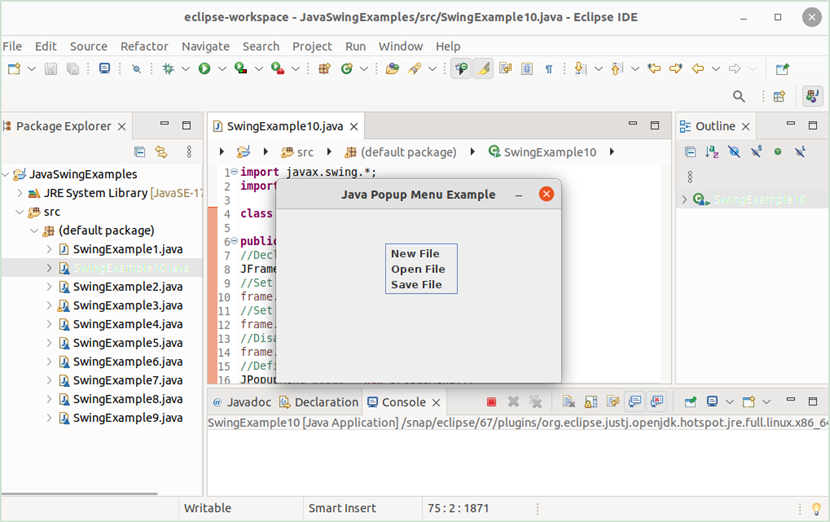
Create a Popup Menu
The JPopupMenu class is used to create the popup menu in Java. Create a Java file with the following code that displays a popup menu of three items. The menu items are “New file”, “Open file”, and “Save file”. The action listener method is added here to display a message based on the selected menu item.
import java.awt.event.*;
class SwingExample10 {
public static void main(String[] args) {
//Declare JFrame object
JFrame frame = new JFrame();
//Set the title
frame.setTitle("Java Popup Menu Example");
//Set the window size
frame.setSize(350, 250);
//Disable the resize option
frame.setResizable(false);
//Define a JPopupMenu object
JPopupMenu popup = new JPopupMenu();
//Define the first menu item
JMenuItem menuItem = new JMenuItem("New File");
//Add listener code for the first menu item
menuItem.addActionListener(new ActionListener() {
public void actionPerformed(ActionEvent e) {
JOptionPane.showMessageDialog(frame, "New file is clicked!");
}
});
//Add the first menu item to the popup menu
popup.add(menuItem);
//Define the second menu item
menuItem = new JMenuItem("Open File");
//Add listener code for the second menu item
menuItem.addActionListener(new ActionListener() {
public void actionPerformed(ActionEvent e) {
JOptionPane.showMessageDialog(frame, "Open File is clicked!");
}
});
//Add the second menu item to the popup menu
popup.add(menuItem);
//Define the third menu item
menuItem = new JMenuItem("Save File");
//Add listener code for the third menu item
menuItem.addActionListener(new ActionListener() {
public void actionPerformed(ActionEvent e) {
JOptionPane.showMessageDialog(frame, "Save File is clicked!");
}
});
//Add the third menu item to the popup menu
popup.add(menuItem);
//Add mouse listener for the JFrame
frame.addMouseListener(new MouseAdapter() {
@Override
public void mousePressed(MouseEvent e) {
showPopup(e);
}
@Override
public void mouseReleased(MouseEvent e) {
showPopup(e);
}
private void showPopup(MouseEvent e) {
if (e.isPopupTrigger()) {
popup.show(e.getComponent(), e.getX(), e.getY());
}
}
});
//Set window position
frame.setLocationRelativeTo(null);
//Make the window visible
frame.setVisible(true);
}
}
Output:
The following dialog box will appear after executing the Java class file and pressing the right button of the mouse:
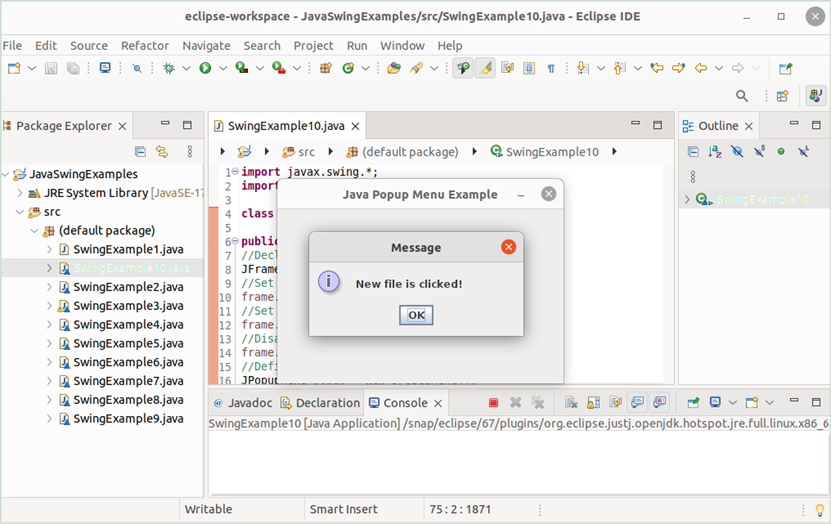
The following output will appear if the user selects the “New File” menu item from the popup menu:
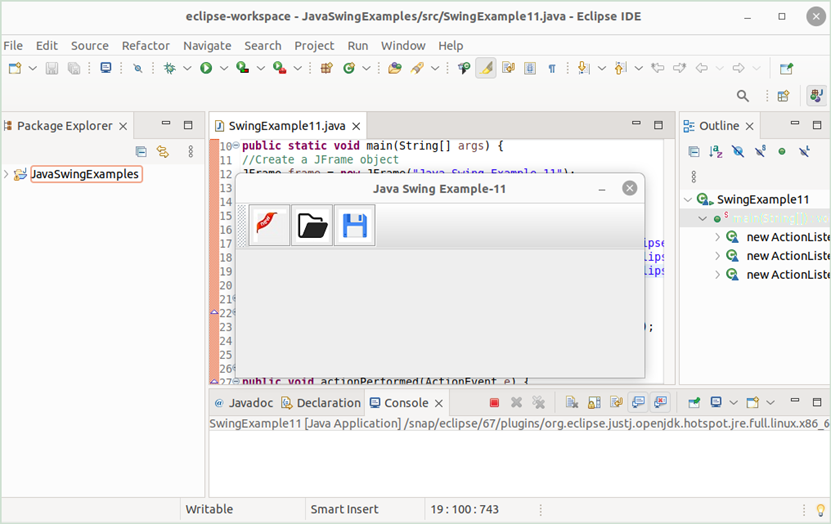
Create a Toolbar
The JToolBar class is used to create a toolbar in the Java application. Create a Java file with the following code to create a toolbar with three toolbar buttons. Three images are used here to add the image of the toolbar button. The active listener method is created for each button.
import java.awt.event.ActionEvent;
import javax.swing.JButton;
import javax.swing.JFrame;
import javax.swing.*;
import java.awt.event.*;
class SwingExample11 {
public static void main(String[] args) {
//Create a JFrame object
JFrame frame = new JFrame("Java Swing Example-11");
//Create a JToolBar object
JToolBar toolbar = new JToolBar();
//Create three toolbar buttons
JButton btnNew = new JButton(new ImageIcon("/home/fahmida/eclipse-workspace/JavaSwingExamples/src/images/new.jpeg"));
JButton btnOpen = new JButton(new ImageIcon("/home/fahmida/eclipse-workspace/JavaSwingExamples/src/images/open.png"));
JButton btnSave = new JButton(new ImageIcon("/home/fahmida/eclipse-workspace/JavaSwingExamples/src/images/save.png"));
//Declare addActionListener methods for three buttons
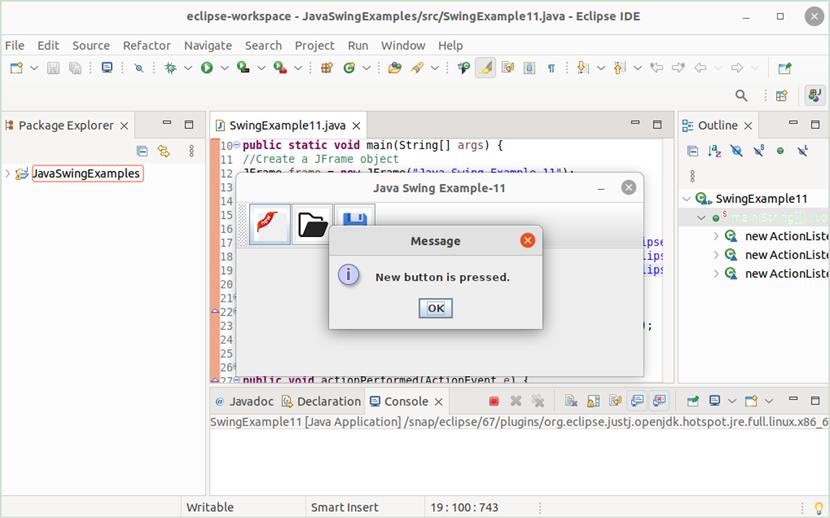
btnNew.addActionListener(new ActionListener() {
public void actionPerformed(ActionEvent e) {
JOptionPane.showMessageDialog(frame, "New button is pressed.");
}
});
btnOpen.addActionListener(new ActionListener() {
public void actionPerformed(ActionEvent e) {
JOptionPane.showMessageDialog(frame, "Open button is pressed.");
}
});
btnSave.addActionListener(new ActionListener() {
public void actionPerformed(ActionEvent e) {
JOptionPane.showMessageDialog(frame, "Save button is pressed.");
}
});
//Add buttons to the toolbar
toolbar.add(btnNew);
toolbar.add(btnOpen);
toolbar.add(btnSave);
//Set the frame layout
frame.setLayout(new BorderLayout());
//Add toolbar to the frame at the beginning of the frame
frame.getContentPane().add(toolbar, BorderLayout.PAGE_START);
//Set the window size
frame.setSize(500, 250);
//Disable the resize option
frame.setResizable(false);
//Set window position
frame.setLocationRelativeTo(null);
//Make the window visible
frame.setVisible(true);
}
}
Output:
The following dialog box will appear after executing the Java class file:
If the user clicks on the “New” button, the following output will appear:
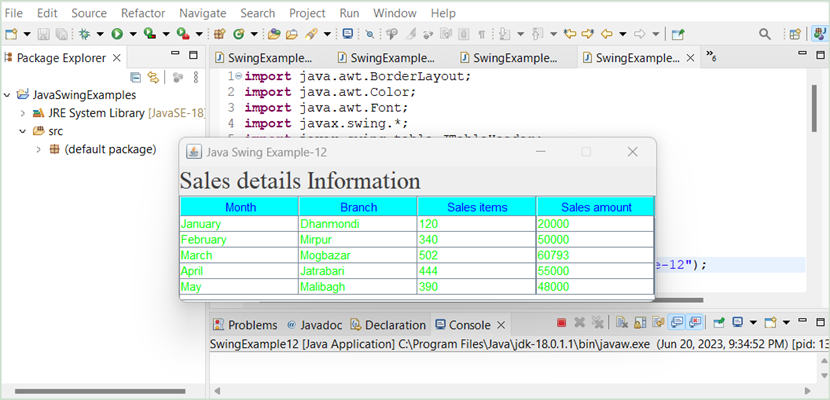
Display the Tabular Data
The JTable class is used to display the tabular output in Java. Create a Java file with the following code to display the data of a two-dimensional array in tabular form. The JTableHeader class is used here to format the table header.
import java.awt.Color;
import java.awt.Font;
import javax.swing.*;
import javax.swing.table.JTableHeader;
class SwingExample12 {
public static void main(String[] args) {
//Declare the JFrame object
JFrame frame = new JFrame("Java Swing Example-12");
//Declare an array of objects
Object[][] Sales = {
{"January", "Dhanmondi", 120, 20000},
{"February", "Mirpur", 340, 50000},
{"March", "Mogbazar", 502, 60793},
{"April", "Jatrabari", 444, 55000},
{"May", "Malibagh", 390, 48000}
};
//Declare an array to store the table heading
String[] colHeader = {"Month", "Branch", "Sales items", "Sales amount" };
//Declare the JTable object
JTable table = new JTable(Sales, colHeader);
//Set the font color of the table
table.setForeground(Color.GREEN);
//Set the table viewpoint height
table.setFillsViewportHeight(true);
//Declare JTableHeading object
JTableHeader tableHeader = table.getTableHeader();
//Set the background color of the table heading
tableHeader.setBackground(Color.CYAN);
//Set the font color of the table heading
tableHeader.setForeground(Color.blue);
//Declare the label to display table caption
JLabel tblCaption = new JLabel("Sales details Information");
//Set font setting for the table caption
tblCaption.setFont(new Font("Times New Roman",Font.TRUETYPE_FONT,25));
tblCaption.setForeground(Color.darkGray);
//Declare the JScrollPane object
JScrollPane scrollPane = new JScrollPane(table);
//Set the layout and add the table caption and scroll into the frame content
frame.getContentPane().setLayout(new BorderLayout());
frame.getContentPane().add(tblCaption,BorderLayout.PAGE_START);
frame.getContentPane().add(scrollPane,BorderLayout.CENTER);
//Set the width and height of the frame
frame.setSize(500, 175);
//Disable the resize option
frame.setResizable(false);
//Set window position
frame.setLocationRelativeTo(null);
//Make the frame visible
frame.setVisible(true);
}
}
Output:
The following dialog box will appear after executing the Java class file:
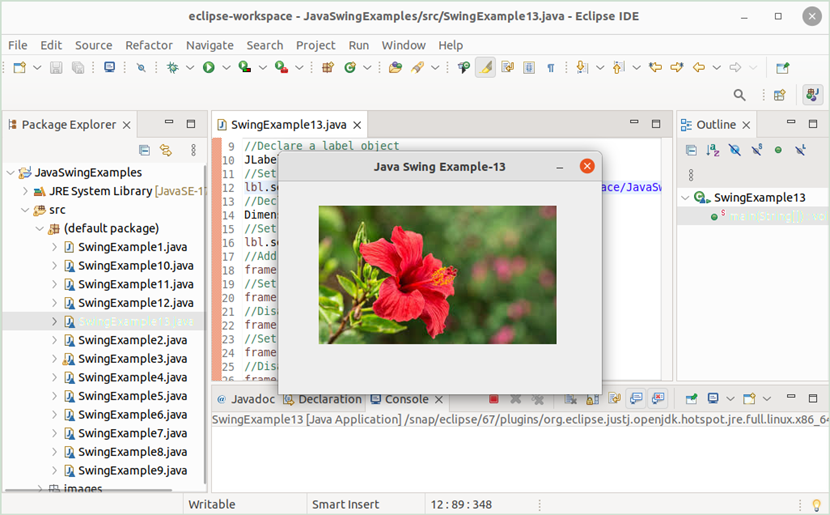
Working with Image
The ImageIcon class is used to add the image in different Java Swing Controls. Create a Java file with the following code that adds the image in the label and display the label with the image in the output.
import javax.swing.*;
class SwingExample13 {
public static void main(String[] args) {
//Declare a Frame object
JFrame frame = new JFrame();
//Declare a label object
JLabel lbl = new JLabel();
//Set the image for the label using ImageIcon
lbl.setIcon(new ImageIcon("/home/fahmida/eclipse-workspace/JavaSwingExamples/src/images/flower.jpeg"));
//Declare a dimension object
Dimension size = lbl.getPreferredSize();
//Set the position of the label
lbl.setBounds(50, 30, size.width, size.height);
//Add label to the frame
frame.add(lbl);
//Set the frame title
frame.setTitle("Java Swing Example-13");
//Disable the default layout
frame.setLayout(null);
//Set the frame size
frame.setSize(400, 300);
//Disable the resize option
frame.setResizable(false);
//Set frame position
frame.setLocationRelativeTo(null);
//Make the frame visible
frame.setVisible(true);
}
}
Output:
The following dialog box will appear after executing the Java class file. The “follower.jpeg” image file is added to the label:
Generate a Random Number
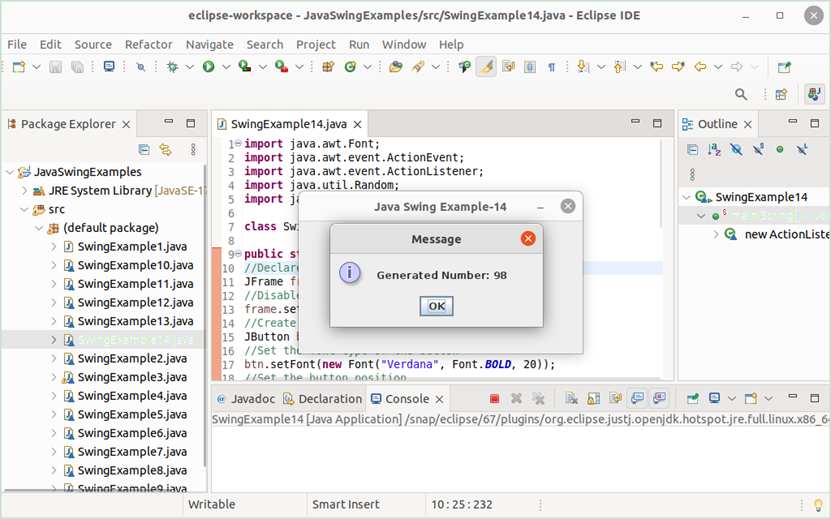
The “Random” class is used to generate different types of random numbers. Create a Java file with the following code that generates a random number between 1 to 100 when the button is pressed. The generated random number is displayed in a message dialog box.
import java.awt.event.ActionEvent;
import java.awt.event.ActionListener;
import java.util.Random;
import javax.swing.*;
class SwingExample14 {
public static void main(String[] args) {
//Declare a Frame object
JFrame frame = new JFrame();
//Disable default frame layout
frame.setLayout(null);
//Create a button object
JButton btn = new JButton("Generate Number");
//Set the font type of the button
btn.setFont(new Font("Verdana", Font.BOLD, 20));
//Set the button position
btn.setBounds(45, 50, 250, 40);
//Add button to the frame
frame.add(btn);
//Add the action listener for the button
btn.addActionListener(new ActionListener() {
public void actionPerformed(ActionEvent e) {
//Create a random object
Random num = new Random();
//Generate a random number
int n = num.nextInt(100) + 1;
//Convert integer to string
String rnum = String.valueOf(n);
//Display the random number in the message box
JOptionPane.showMessageDialog(frame, "Generated Number: " + rnum);
}
});
//Set the title
frame.setTitle("Java Swing Example-14");
//Set the window size
frame.setSize(350, 200);
//Disable the resize option
frame.setResizable(false);
//Set window position
frame.setLocationRelativeTo(null);
//Make the window visible
frame.setVisible(true);
}
}
Output:
The following dialog box will appear after executing the Java class file:

A new number is generated when the button is pressed and the following similar dialog box will be displayed. Here, the number 98 is generated as a random number:
Develop a Simple Login System
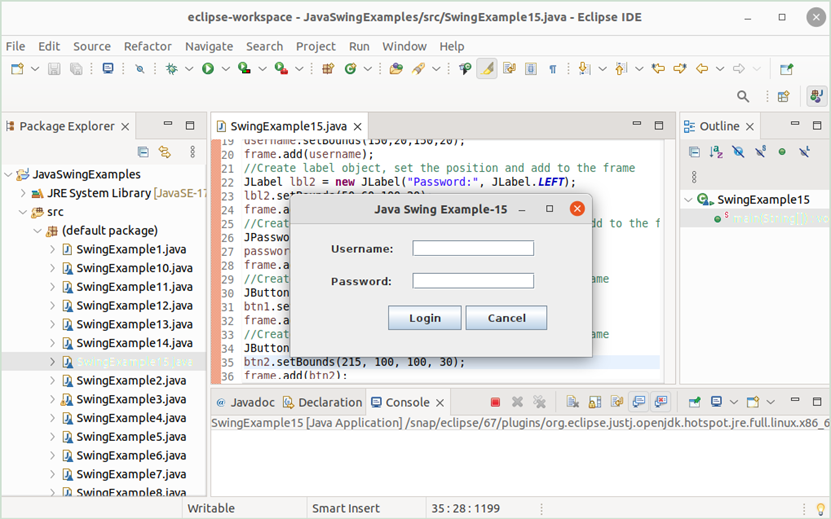
Create a Java file with the following code that displays a login form to take the username and password from the user and check whether the user credentials are correct or incorrect. If the “admin” value is taken as the username and the “password” value is taken as the password, the “Authenticated” message is printed. Otherwise, the “Not Authenticated” message is printed. The “Login” button is used to take the input values and the “Cancel” button is used to terminate the program.
import javax.swing.*;
class SwingExample15 {
public static void main(String[] args) {
//Declare frame object
JFrame frame = new JFrame();
//Set the title
frame.setTitle("Java Swing Example-15");
//Set the window size
frame.setSize(370, 200);
/*Create a label object, set the position, and add to the frame*/
JLabel lbl1 = new JLabel("Username:", JLabel.LEFT);
lbl1.setBounds(50,20,100,20);
frame.add(lbl1);
/*Create text object, set the position, and add to the frame*/
JTextField username = new JTextField();
username.setBounds(150,20,150,20);
frame.add(username);
//Create label object, set the position and add to the frame
JLabel lbl2 = new JLabel("Password:", JLabel.LEFT);
lbl2.setBounds(50,60,100,20);
frame.add(lbl2);
/*Create password text object, set the position and add to the frame*/
JPasswordField password = new JPasswordField();
password.setBounds(150,60,150,20);
frame.add(password);
/*Create a button, set the position, and add to the frame */
JButton btn1 = new JButton("Login");
btn1.setBounds(120, 100, 90, 30);
frame.add(btn1);
/*Create a button, set the position, and, add to the frame*/
JButton btn2 = new JButton("Cancel");
btn2.setBounds(215, 100, 100, 30);
frame.add(btn2);
//Set window position
frame.setLocationRelativeTo(null);
//Disable the default layout of the frame
frame.setLayout(null);
//Make the window visible
frame.setVisible(true);
//Handle the login information
btn1.addActionListener((ActionEvent e) -> {
String un = username.getText();
String ps = new String(password.getPassword());
if(un.equals("admin") && ps.equals("secret"))
JOptionPane.showMessageDialog(null, "Authenticated.");
else
JOptionPane.showMessageDialog(null, "Not Authenticated.");
});
//Terminate from the program
btn2.addActionListener((ActionEvent e) -> {
System.exit(0);
});
}
}
Output:
The following dialog box will appear after executing the Java class file:
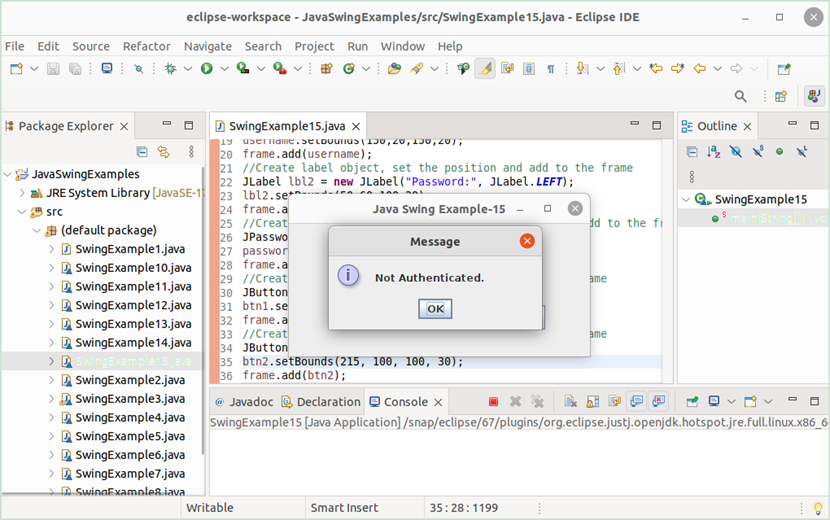
If the “Login” button is pressed by keeping the username and password fields empty or by taking invalid values in these fields, the following output will appear:
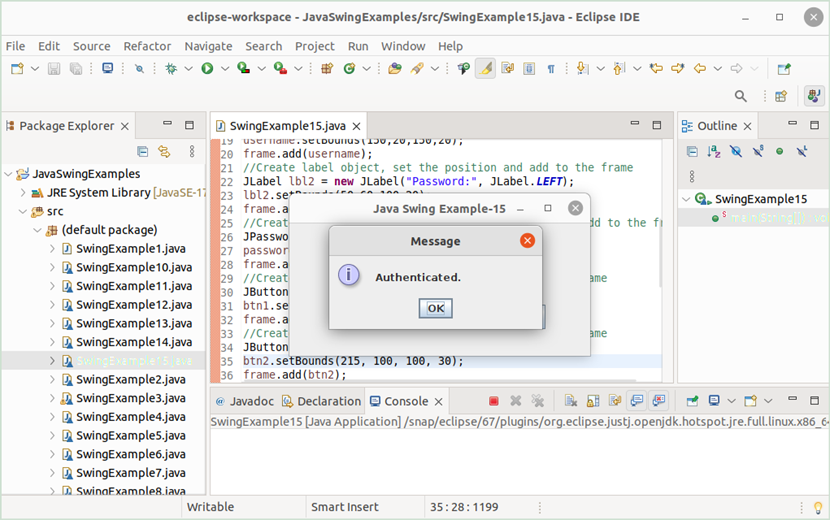
If the “Login” button is pressed by taking the valid values in the username and password fields, the following output will appear:
Conclusion
Any desktop application can be developed easily using both Java AWT and Java Swing toolkits. The most commonly used Swing controls to develop the desktop applications are used in 15 examples of this tutorial. This tutorial will help the new Java programmers to learn the method of developing the desktop applications using the Java Swing controls from the basic.